
Table of Content
- What Is Affiliate Marketing?
- Amazon Affiliate Marketing Through Social Media
- Amazon Affiliate Marketing Through Website or Blog
- Set Up An Amazon Affiliate Marketing Website
- Buy Fastest Hosting & Get Free Domain
- Installing WordPress
- WordPress Important Settings
- Remove Unused Theme & Plugin
- Install Theme & Useful Plugin
- Create Useful Pages
- Create Category & Menus
- Add New Posts
- Design Homepage
- Theme Customization
- Making Website Responsive
So you want to make a passive income through affiliate marketing? Great! Affiliate marketing is a great way to generate passive income. But to start affiliate marketing, you must know how to create an amazon affiliate marketing website.
What Is Affiliate Marketing?
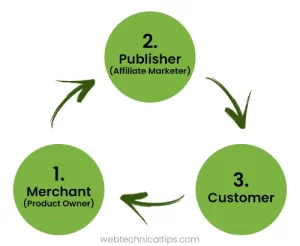
The internet is full of online earning opportunities and affiliate marketing is one of them. Affiliate marketing is where you market products on your platform for a commission-based revenue stream. Unlike in advertisement, you get a commission for every product sold through your affiliate link in affiliate marketing.
Talking about the most trusted affiliate platform in today’s time, the name of Amazon Affiliate Marketing comes at the top. There are mainly two ways you can do affiliate marketing: social media and website or you can say blog.
Amazon Affiliate Marketing Through Social Media
Social media affiliate marketing is an umbrella term that comprises affiliate marketing through various social media platforms like Pinterest, YouTube, LinkedIn, Instagram, Twitter, Facebook, Telegram, and WhatsApp.
Among these, YouTube is the most popular platform for affiliate marketing; because, it is easier to generate traffic through videos than static posts.
Since creating accounts on these platforms is absolutely free, a lot of marketers, especially gen Z creators, prefer social media platforms for affiliate marketing. Instagram and Pinterest are extremely popular among affiliate marketers.
For affiliate marketing through social media platforms, you must create attention-grabbing content, catch titles, appropriate alt text and relevant hashtags. However, a majority of affiliate marketers still prefer creating their blog/website for promoting products.
Amazon Affiliate Marketing Through Website or Blog
There are two methods of creating an affiliate marketing blog: the free method (blogger.com) and paid method (WordPress). If you are a beginner just starting with affiliate marketing, you can try the free methods to understand how blogging works.
But if you already know how affiliate marketing works, blogging on WordPress is more suitable as well as advisable. Customizable themes and high-end features make WordPress an ideal hosting platform for professional bloggers.
Setting up a blog on WordPress might be challenging for new users. In this blog, we will see a detailed explanation of setting up an affiliate marketing website on WordPress.
How To Set Up An Amazon Affiliate Marketing Website in WordPress
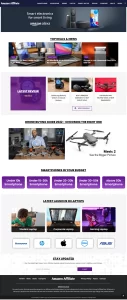
Before we start with a step-by-step guide on how to create an affiliate marketing website with WordPress, here’s an example of how an affiliate site looks:
Buy Fastest Hosting & Get Free Domain
For a website to function properly and handle the incoming traffic, it is extremely important to choose the right hosting platform. While there are several web hosting providers, we will select Bluehost, the best in the business.
Nearly 40% of the websites globally are on WordPress and WordPress itself recommends BlueHost. After opening the Bluehost website, hover your mouse over the ‘Hosting’ menu and select ‘Shared Hosting’.
Scroll down a little and click on the ‘Get Started Button’. You will get two options to choose server locations: US and India. You can make the selection depending on the location of your target audience.
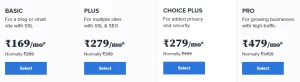
Next, you will see 4 different plan options. You can select depending on the number of websites you want to host and the amount of traffic. The basic plan comes for just Rs. 169/month.
Once you select the plan, you will get the option to create a domain. You can either create a new domain or Use a domain you own. Once you select second option, you have to replace the name server with the domain to get started.
Next, you will be redirected to the signup screen where you are required to make payment for the plan. You can also sign in with your Google account.
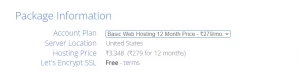
A 1-year plan costs you approx. Rs.3348 without tax and you get a domain, SSL and CDN for free. Select your plan, proceed with the payment and you are good to go.
Installing WordPress
Once you have purchased the hosting, you will get a welcome mail from Bluehost. You’ll get another mail containing your name server, FTP account and a password reset link. Once you click on the link, you will have to enter the domain name and the new password to reset the password.
Next, go to Bluehost website and click on ‘Login’. After Login You’ll see a “My Sites’ option. After clicking on My Sites, you’ll see your domain name. If you are unable to see your domain name, click on ‘Add Domain’ and then click on ‘create new site’.
Enter the site name as per your choice, followed by a catchy tag that describes what your site is all about. Click on next and WordPress installation will start automatically.
You’ll see some options to select from to describe the type of your website. Simply click on ‘skip’ and you will reach a ‘Congratulations’ screen where you can see your login credentials. Note down your password somewhere safe for recovery.
Next, click on ‘go back to my sites’. Click on manage sites and then ‘settings’. Uncheck or turn off the ‘Coming Soon Page’. Next, add ‘https’ to ‘site url’ for better security and click on ‘save updates’.
Next, go to ‘security’ tab and turn on SSL if it is turned off. Also, click on ‘enforce SSL. Now, log in to WordPress and you will be redirected to the WordPress page.
WordPress Important Settings
Once you are on the WordPress window, click on Dashboard and then Settings. On the ‘Settings’ window, Update the Site Title and Tagline as per your choice. Make sure you have ‘https’ in WordPress Address as well as Site Address.
Scroll down and select your time zone and select cache level as ‘Off’. Change it to ‘Level 2’ once activities on the blog start. Now go to the ‘Permalinks’ section, select ‘Post name’ and click on ‘Save Changes’. Basic WordPress settings are done.
Remove Unused Theme & Plugin
You must remove themes and plugins that are of no use to your blog. Go to the ‘Plugin’ section on your blog and select all. Now, deselect ‘Bluehost’ and ‘WPForms Lite’ and deactivate the rest.
Now, repeat the same process again and delete the unwanted plugins. Next, go to the ‘Appearance’ section for theme-related settings. Delete the extra themes except the one applied on your website.
Install Theme & Useful Plugin
Go to the theme section once again to select a suitable theme for your blog. I suggest using the OceanWP theme this time, which is extremely popular among bloggers. I personally use this theme as well. Install the theme and click on ‘Activate’.
You will need to install some plugins for ‘OceanWP’ to work properly. One such plugin is ‘Ocean Extra’, which is a must for your theme. So install the plugin right there. Make sure you delete the previous theme after activating Ocean WP. You can customize your theme to get the desired look for your website.
Next, you will need to install some useful plugins. Here is a list of all the plugins that you need to install: Elementor, Essential Addons for elementor, Ocean Custom Sidebar, Ocean Extra, Ocean Posts Slider, Ocean Stick Anything, Premium Addons for Elementor, and WpForm Lite.
Select all the plugins after installation and Activate them all at once. Now, all the necessary themes and plugins are installed.
Create Useful Pages
If you want to learn about WordPress in detail, you can watch the WordPress tutorial on our Youtube Channel Now, go to the WordPress dashboard and select the ‘Pages’ section. Click on ‘all pages’ and delete the ‘sample page’.
You can make as many new pages as you want by clicking on ‘Add New’. First of all, create a Home page. You can customize the pages later on. Just create the necessary pages first. You will need some common pages like ‘About’, ‘Contact’, ‘Blog’ and ‘Privacy Policy.
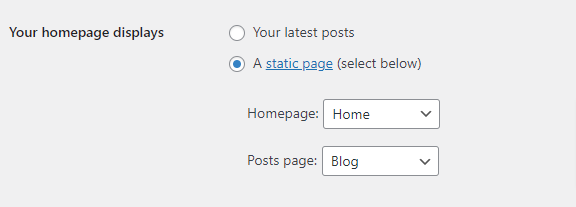
You can add your website address on the search console to see how your website looks. Go to the ‘Settings’ section and click on ‘Reading’. Click on ‘A static page’, select ‘Home’ in the Homepage dropdown and ‘Blog’ in the Posts page dropdown. Click on Save Changes and you are done.
Now, go to the ‘User’ section and replace the default name with the name you want to display as the publisher for your blog. Also, add the website address and enter a short bio. You can also add a display picture if you want. Now, simply click on ‘Update Profile’.
Create Category & Menus
Once you have created the pages, you need to create different categories for promoting different types of projects. To create categories, you need to go to the ‘Posts’ section on the WordPress dashboard and click on ‘Categories. You can create as many categories as you want, depending on your blog’s requirements.
Say you are a blog promoting electronic gadgets, then the categories would include smartphones, laptops, smartwatches, cameras, wireless devices, etc.
Now that you have created the categories, it’s time to create menus. For creating a menu, you need to go to the ‘Appearance’ section and select ‘Menus’. You need several menus to create an attractive and user-friendly blog such as header menu, footer menu, etc.
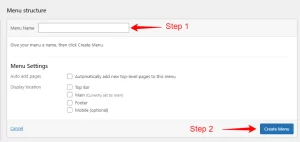
To create a Menu, you need to enter a generic name (say main or footer) in Menu name field after that just click on create menu button below.
Then go to ‘categories’ and select the categories you want to appear in a particular menu. You can also change the order of categories in the menu simply by clicking & dragging. You need to follow the same steps every time you create a menu.
Do not forget to watch our video to understand in detail, the process of creating menus. You can also add pages like About Us and Contact to the menu.
Add New Posts
As the name suggests, the option is used to create/publish new posts on your blog. To add a new post, you need to go to the ‘Posts’ section and click on ‘Add New’. You will get a text console in front of you with different fields for the title and body. You can enter whatever text you want.
Additionally, you can also add images to make your blog more informative. It is suggested to use images in WEBP format for faster load time.
Remember to add heading tags: H1,H2, and H3, for every sub-headline as it is an SEO-friendly practice. You can also change other text properties such as colour, and style through ‘Post’menu on the right side of the window.
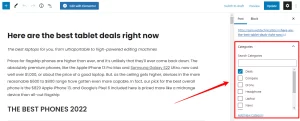
Once you have drafted the blog, select the category depending on the post. To select a category, you will have to go to the ‘Post’ block on the right side of the console. After the category, you can also add ‘Tags’ that best describe the post for SEO.
At the bottom, you will find the option to set the featured image for the blog. Make sure you add Alt text for every image you add. After that, you can simply click on ‘Publish’ and your post will go live. You can also click on ‘Preview’ to check how your post appears before publishing the blog.
Once you have enough traffic on your website, you can go to the Amazon website and create an Affiliate account. Once you have the account, you can copy a product’s affiliate link from your affiliate account and paste it on the call-to-action button on your blog to start earning.
Design Website Homepage
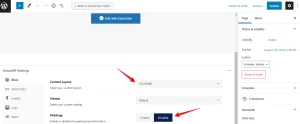
Go to ‘Pages Section, and click on the ‘Edit’ option under ‘Home’. Select Content Layout to ‘Full Width’ and Disable ‘Padding’. Also disable ‘Title’ and ‘Breadcrumbs’ and then click on ‘Update’ to apply the changes.
Now, click on ‘Edit With Elementor’ to design your homepage. After entering the Elementor, you will see some widgets on the left side of the screen. You can drag those widgets and drop them on the screen to use them.
At the center of the screen, you’ll see an option with a ‘+’ icon. Click on that icon to select the structure of a particular section on the homepage.

From adding a banner to adding images and animations, you can design your homepage as you want with Elementor. Elementor lets you design your pages without any coding knowledge. You can also add slides to your homepage by clicking on the ‘Posts Slider’ section.
Home Page Design starts here https://youtu.be/DTRgPp93nks
Creating Custom Footer Section
To create a custom footer, go to the ‘OceanWP’ section in the WordPress dashboard and select ‘My Library’. Click on ‘Add New’ and enter ‘Fot’ in the title bar. Enter Publish and your footer template is created. Make sure that you select the Content layout to ‘Full Width’ while creating the template.
Now, click on ‘Edit with Elementor’. You can design your footer the way you want with Elementor. The design of the footer can be done using the same method as the homepage.
To call the custom footer, go to the ‘Appearance’ section in the dashboard and click on ‘Customize’. Now go to ‘Footer Widgets’, click on Enable Footer Widget and change ‘My Library’ to ‘Fot’ or whatever the name of your custom footer. Change Padding to 0px and turn on ‘Fixed Footer’.
Setting Up Privacy Policy Page
Go to the ‘Pages’ section and hit on ‘Edit’ under the Privacy Policy page. Draft the content on the page as per the nature of your blog. You can take references from our Blog’s privacy page as well. You can edit other pages such as About Us, Contact, etc. Adjust the page setting to ‘Full Width’ for a better view.
Theme Customization
Theme customization is one of the most important parts of creating an affiliate marketing website in WordPress. First, adjust the header section to give your site a professional look. For adjusting the header section, go to the Appearance Section and hit on ‘Customize’.
Upload a site icon and then go to General Styling under the General Options section. Here, you can change the color of your blog as per your wish. A vibrant color combination is critical to keep uses glued to your blog.
A lot of other settings can be done using the ‘Customize’ method. Another important part of theme customization is designing your blog format. Make sure that your blog heading is in H1.
You can also change your ‘Blog Style’ to ‘grid’. Make sure you click on ‘Update’ every time you make a change. Of course, you can learn how to design your pages like a pro by watching our Below Mention Video Tutorial.
Making Website Responsive
A website must be responsive to attract user attention, generate leads and rank well on search engines. You will need two banners: one for mobile and one for tabs and computers or laptop.
Make sure you hide the banner made for mobile for computers and tabs. Similarly, hide the desktop banner for mobile. This can be done through the ‘Advanced’ section under settings. (you can learn it from here)
Also Read:
Elementor Review: Is It Really #1 WordPress Page Builder?
7 Easy Steps to Start a Blog from Scratch & Make Money Online 2022 [Updated]
Final Word
Follow the 13 Steps mentioned above to create an amazon affiliate marketing website in WordPress from scratch. All important resources like plugins, and best hosting platforms, already discussed in this article. If you have any doubts or queries, feel free to write to us or simply comment down below.
Hope this helps you in starting your Amazon affiliate marketing journey. Happy blogging!

Bhai E-commerce website me password reset link customer ko received📩 nahi ho rahi
Please help
Check Spam Folder, Wahi deliver ho raha hoga. Agar Inbox me mail deliver karwana hai to ye video dekhlo https://youtu.be/zK5JDj0M8x4
bhai, Amazon Affiliate Marketing k liye alag se website honie chahye ya portfolio website mai Page hona chahyei
alag hogi to better rahega, baki aap portfolio me blog section add karke bhi amazon affiliate kar sakte hai.